Custom Fields and Custom Dates provide a simple way to extend rezStream Cloud to work the way you work and capture the information you need to run your unique business.
- Person and Reservation Custom Fields
- Person Custom Dates
- Setting Up Custom Fields and Dates
- Using Person Custom Fields and Dates
- Capturing Custom Fields on the Booking Engine
Person and Reservation Custom Fields
Custom Fields can be applied to People or to Reservations. But what's the difference?
Person Custom Fields
A Person Custom Field is displayed and managed on the Person detail screen. This means, it is data connected to a person and it doesn't change between reservations. Examples of Person Custom Fields would be things like:
- Kids, pets, or spouses' names
- Dietary restrictions or needs
- VIP status or loyalty status
- Anything you need to keep track of that sticks with the guest forever
NOTE: Person Custom Fields should NOT contain information that will change each time a guest stays with you. For that information, you should use Reservation Custom Fields.
Reservation Custom Fields
A Reservation Custom Field is displayed and managed on the Reservation detail screen. This means it is data connected to and specific to only that reservation. Some good examples include:
- Arrival/Departure times
- Housekeeping notes
- Special needs/details about this stay
- Boat type/needs
- License plate number or vehicle type they will be driving
- Anything you need to keep track of on each reservation
Person Custom Dates
In addition to Custom Fields, rezStream Cloud also offers Person Custom Dates. This allows you to track important dates that you may want to follow up with your guest. Good examples include:
- Birthdays
- Anniversaries
- Loyalty or Renewal dates
Setting Up Custom Fields and Dates
- Click/Tap on the Configuration section:
![[image]](https://support.rezstream.com/hs-fs/hubfs/Knowledge%20Base%20Import/f08fb78371583988c1bd90c770095f90112f64c0317fb8e726133b9d861ae561-4.png?width=171&height=423&name=f08fb78371583988c1bd90c770095f90112f64c0317fb8e726133b9d861ae561-4.png "embedded image (png)")
- Choose the Custom Fields and Dates section.

- A list of all your Custom Fields will be shown by default. Custom Dates can be viewed by choosing the Dates toggle at the top of the screen.
- To add a new Custom Field, click/tap the Add New Custom Field button in the upper right corner.
![[image]](https://support.rezstream.com/hs-fs/hubfs/Knowledge%20Base%20Import/3b0ea2ad44838b4fa5df232ffa913ffddd957a5e893dc944c7c2c2f0d793b81b-4.png?width=442&height=53&name=3b0ea2ad44838b4fa5df232ffa913ffddd957a5e893dc944c7c2c2f0d793b81b-4.png "embedded image (png)")
- Now, simply give your Custom Field a name (a Label) and apply any rules that apply to your field.
- Apply to either Person or Reservation (as described above)
- Flag as Important - Custom Fields that are "Important" will be displayed and printed on Housekeeping and other reservation reports.
- Mark as Required? - Currently, marking a field as required will make it a required field on the Booking Engine.
- Show on Booking Engine - Enable this if you would like to display this custom field on the Booking Engine and have your guest enter a value when making a booking.
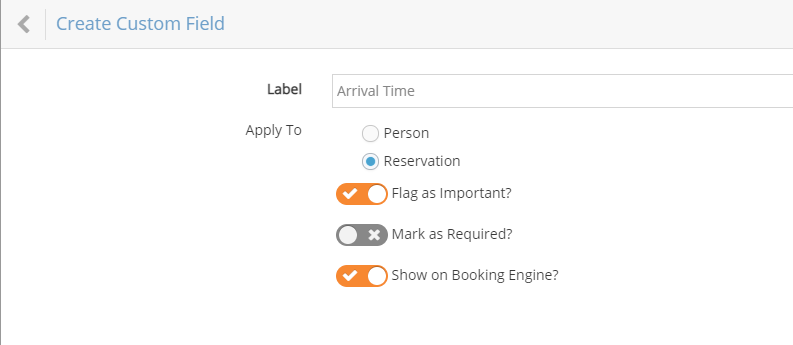
- Finally, click Save Custom Field to save your field.
Using Person Custom Fields and Dates
Person Custom Fields and Dates are managed in the Notes & Details section of the Person detail screen.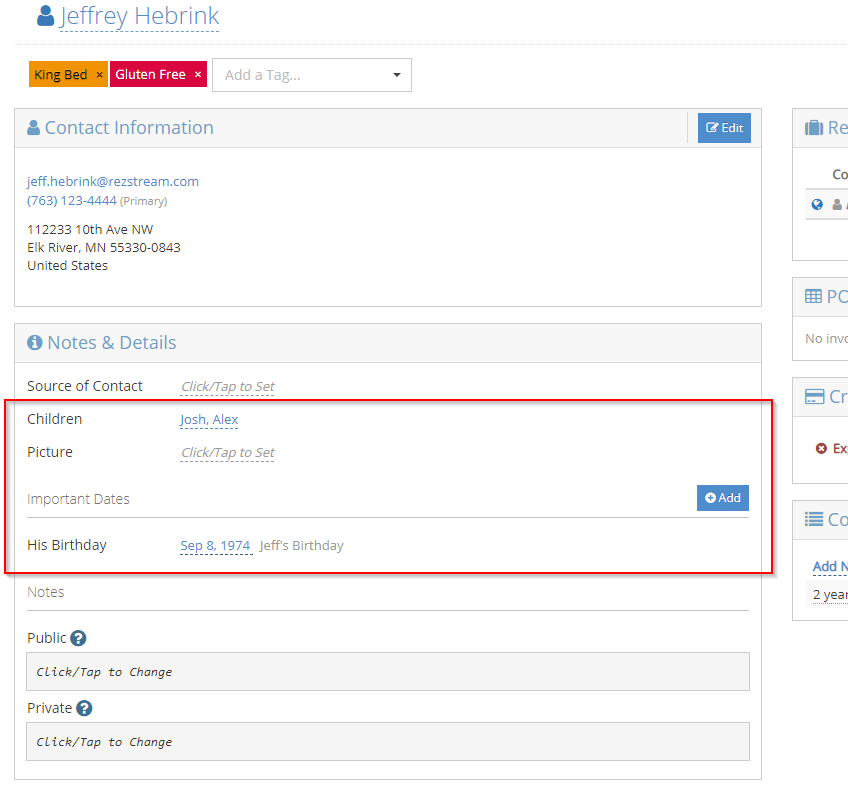
Custom Fields are displayed beneath the Source of Contact field and are simple text fields that can be updated at any time but are empty by default.
Custom Dates (Important Dates) are displayed next and by default, none will be shown. Click the Add button to add an important date for a person and you will be able to choose which type of Custom Date you want to add, specify the date, and also a note or additional information about that date.
Using Reservation Custom Fields
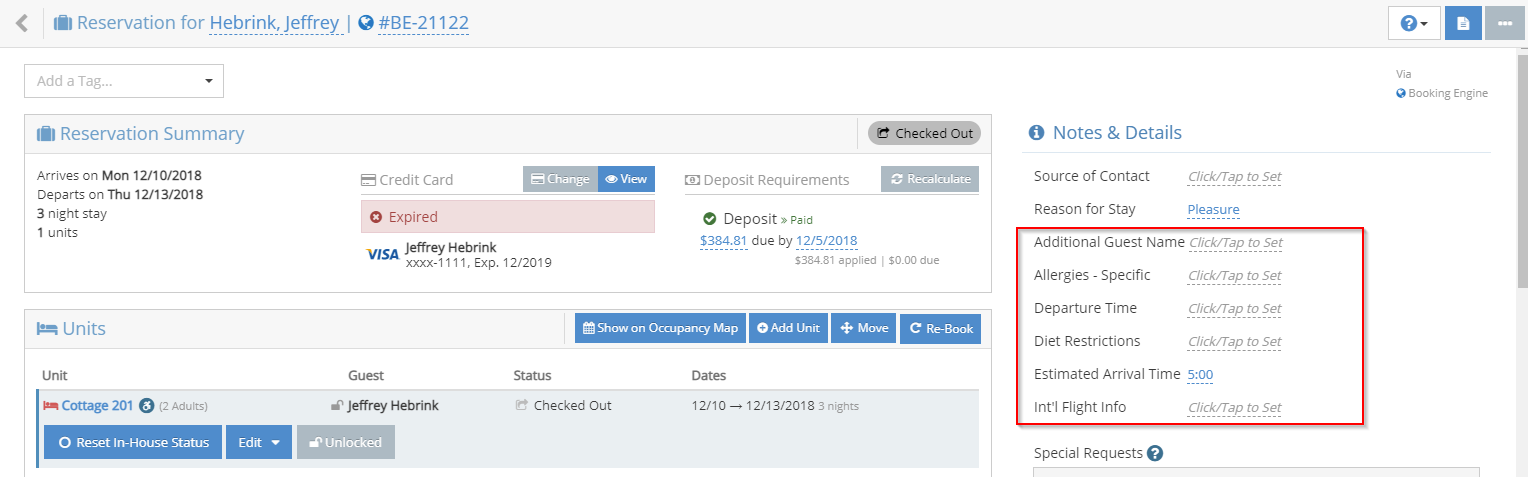
Reservation Custom Fields are managed on the Reservation detail screen in the Notes & Details section. As with Person Custom Fields, they are simple text fields that can be updated at any time and are empty by default.
Capturing Custom Fields on the Booking Engine
As noted earlier, Custom Fields can be displayed and entered by your guest from your Booking Engine.
- Click/tap on Booking Engine in the main navigation menu and then choose the Custom Fields section.
![[image]](https://support.rezstream.com/hs-fs/hubfs/Knowledge%20Base%20Import/34c78ddd3726e3b6ec16076e12c0634e77d2c6729d36a76dffc1190f44da1d29-4.png?width=176&height=365&name=34c78ddd3726e3b6ec16076e12c0634e77d2c6729d36a76dffc1190f44da1d29-4.png "embedded image (png)")
![[image]](https://support.rezstream.com/hs-fs/hubfs/Knowledge%20Base%20Import/e12b200cc4015f90ff2d9c29406e5a273af57fada93e38e992a45da42b836721-4.png?width=168&height=47&name=e12b200cc4015f90ff2d9c29406e5a273af57fada93e38e992a45da42b836721-4.png "embedded image (png)")
- The Custom Fields section will display all the Custom Fields configured in your system and an option for how to display them (or if to display them). You can choose:
- Do not show - to NOT display this custom field at all.
- Show but allow guests to skip it - to show the field, but make it optional for your Booking Engine guest.
- Show and require guests to enter something - to show the field and make it a required field that the guest must enter before completing their reservation.
- Finally, the Sort User Defined Fields button allows you to configure the order in which the fields you've chosen to display on the Booking Engine will be listed.
![[image]](https://support.rezstream.com/hs-fs/hubfs/Knowledge%20Base%20Import/4175395386b2de3100954ec2b4ae4ec4fe888846793333f718e69dbf910ea2c6-4.png?width=618&height=226&name=4175395386b2de3100954ec2b4ae4ec4fe888846793333f718e69dbf910ea2c6-4.png "embedded image (png)")
- Click Save Configuration to save any changes you've made.
- Now, on the "Confirmation" step of your Booking Engine, the custom fields you've configured will be displayed for your guest to enter when making a reservation. If it is a required field (as denoted by the bold label), the guest will receive a message indicating that the field is required to complete the booking.
![[image]](https://support.rezstream.com/hs-fs/hubfs/Knowledge%20Base%20Import/77884ad8114563536d6d36146ae2fe8eb2b2d089d0c915f424a4803fae362ae7-4.png?width=622&height=252&name=77884ad8114563536d6d36146ae2fe8eb2b2d089d0c915f424a4803fae362ae7-4.png "embedded image (png)")