There are a variety of settings that can be used to customize the look and feel of the Occupancy Map.
Accessing the Occupancy Map Settings
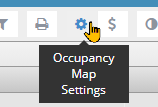
To begin customizing, open the Occupancy Map Settings by navigating to the Occupancy Map and clicking/tapping the toolbar button with the gear icon:
We've split the Occupancy Map Settings up into the following sections:
-
Reservation Colors
Customize the reservation and out-of-service block colors.- Standard Colors
Automatically apply colors based on in-house status, payment status, and configure out-of-service colors. - Custom Colors
Configure a completely custom set of labeled colors that can be applied to reservations based on your custom needs.
- Standard Colors
- Customize the colors used in the unit header section on the left-hand side of the occupancy map based on unit, unit type/rate plan, and/or property.
-
Toggle features of the Occupancy Map; customize weekend days, the clean/dirty feature, and cell display of day or night, and the Book by Type feature.
- Fine-tuning the display of reservations
Customize the cell sizes and the information that is displayed within each reservation on the Occupancy Map.
- Fine-tuning the display of reservations
Reservation Colors
Standard Colors
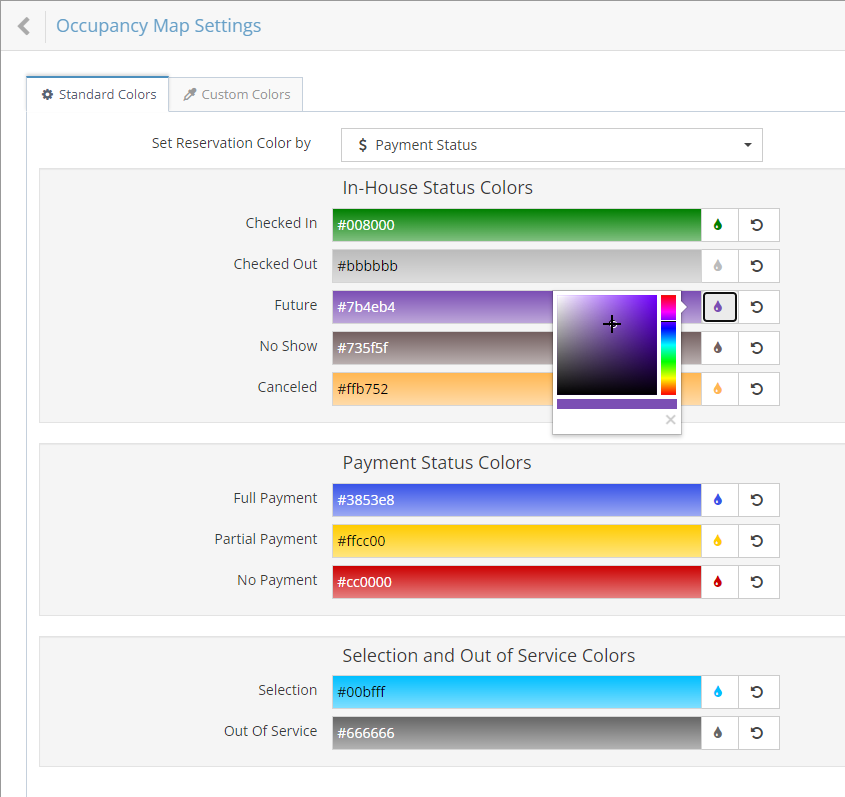
The Set Reservation Color by setting allows you to configure how reservations are displayed on the Occupancy Map.
- In-House Status
- The In-House Status Colors will be used to color unit assignments for reservations based on the current in-house status of each assignment.
- In this mode, the payment status for the reservation will be displayed using a money icon
 in the bottom right-hand corner of each reservation assignment. The color of the icon will be determined by the Payment Status Colors.
- Payment Status
- The Payment Status Colors will be used to color reservations based on the current payment status of the reservation.
- In this mode, the in-house status of the reservation will be displayed using either the no icon (when the reservation assignment has not yet checked in), the checked-in icon
 , or the checked-out icon
  . The color of the icon will be determined by the In-House Status Colors.
The Selection and Out of Service Colors section allows you to control the New Selection color used when creating/selecting reservations and the color for Out of Service blocks.
Custom Colors
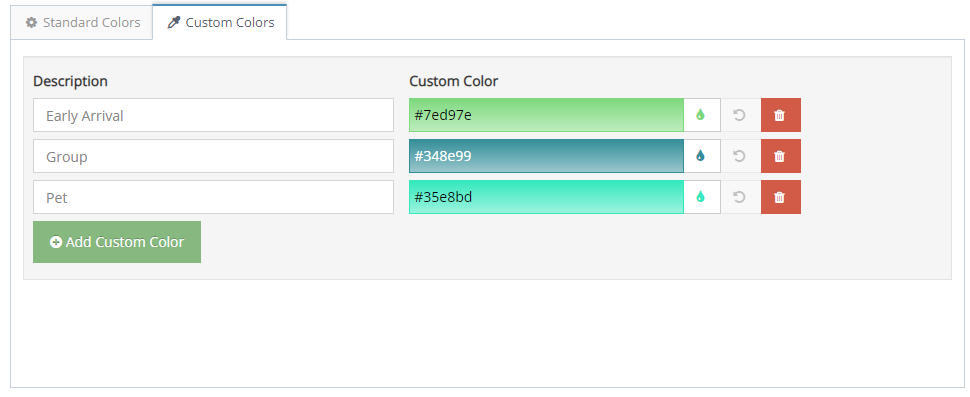
The Custom Colors section allows you to define a list of pre-defined colors that can be applied to any reservation unit assignment at any time. This gives you the ability to apply a custom color for whatever reason that makes sense for your business. For example:
- Groups or Weddings
- Early or Late Arrivals
- Guest bringing a pet
- Anything you want to know immediately when viewing a reservation on the Occupancy Map!
Once your list is set, you'll be able to choose any of the labeled Custom Colors for any Unit assignment within any reservation: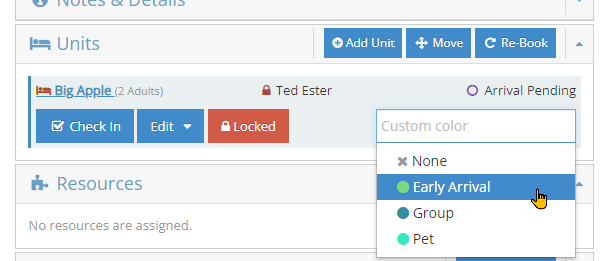
Unit Colors
The Occupancy Map shows the name of the unit in a header section the runs down the left-hand side of the screen. These unit headers can optionally be colored based on the Property or the Unit Type/Rate Plan they belong to, or they can each be colored individually. Or you can use some combination of each of those aspects.
There are a variety of ways you might think about applying colors to your units on the Occupancy Map. Some common examples include:
- Quickly identify units or types of units with the same rates.
- Identify units based on location or their level within a building.
- Indicate specific amenities or views.
- Each unit is unique and deserves its own color!
The Color Options allow you to enable any combination of the 3 options:

With all 3 features enabled, the Property Color Bar will appear on the far left edge of the unit header cell, the Rate Plan (Unit Type) Color Bar will be shown next to the Property Color Bar and finally, the rest of the unit cell can be colored by using the Unit Color option. The following graphic shows an example of how this can look with all 3 features enabled.
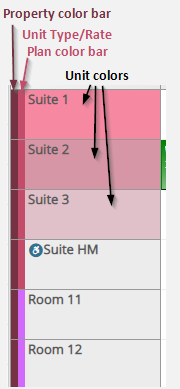
- If the Property Color Bar is not enabled, the Rate Plan (Unit Type) Color Bar will move to the far left, and if neither of those options is enabled, then no color bars will be displayed.
- Each option can be enabled or disabled based on how you like to categorize and display your units.
In the Units section, the Set Colors From dropdown button makes it simple to apply colors categorically to all of your units if you prefer to see the entire unit header colored based on Property or Rate Plan (Unit Type).
For example, consider the following configuration for unit colors: 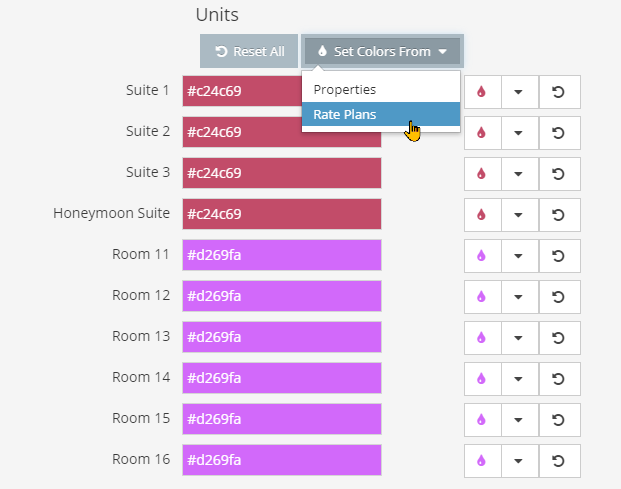
Considering that all these units belong to only a single Property, with all 3 options enabled, the units would appear as shown below on the Occupancy Map with a Property Color Bar on the far left, the Rate Plan (Unit Type) Color Bar next to that and the Unit Color filling the entire background of the unit header cell. 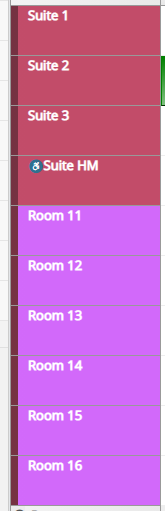
Note that the Rate Plan (Unit Type) Color Bar is actually visible here even though you can't see it because the Rate Plan color and the Unit color are the same. Disabling it would hide that color bar and shift the unit names a little further left which might be valuable depending on the lengths of your unit names.
The Units section also features a dropdown button next to each unit that allows you to apply the color of the Property or the Rate Plan (Unit Type) for only that unit (as shown below): 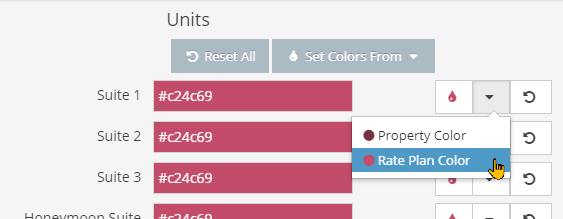
Display Settings
Weekend Days - The days chosen here will be shaded on the Occupancy Map display to make mid-week and weekend days more visually obvious.
Show Clean/Dirty - Toggle the Clean/Dirty feature. With the Clean/Dirty toggle enabled, units can be marked as Clean and Dirty from the Occupancy Map.
Book by Type - Toggle Book by Type mode. With the Book by Type toggle enabled, the Occupancy Map will collapse units into their Rate Plan (Unit Type). For businesses with lots of units or groups of units with identical rates, this can really help simplify the Occupancy Map display by only showing "types" of units by default, rather than all individual units.
Display Assignments by either Day or Night Mode: Select Day to display that day or select Night for a split view.
- Select by Day to view reservation assignments aligned with the beginning and end of the day on the Occupancy Map.

- Select by Night to shift the display of reservation assignments to a nightly view where reservations arrive in the afternoon and depart the following morning.

Fine-Tuning the Display of Reservations
In addition to applying colors and icons to indicate the various reservation statuses, rezStream Cloud also offers a number of ways to control what information is displayed within each unit assignment within each reservation. This granular control allows you to decide the most important information to display on the Occupancy Map for your own needs.
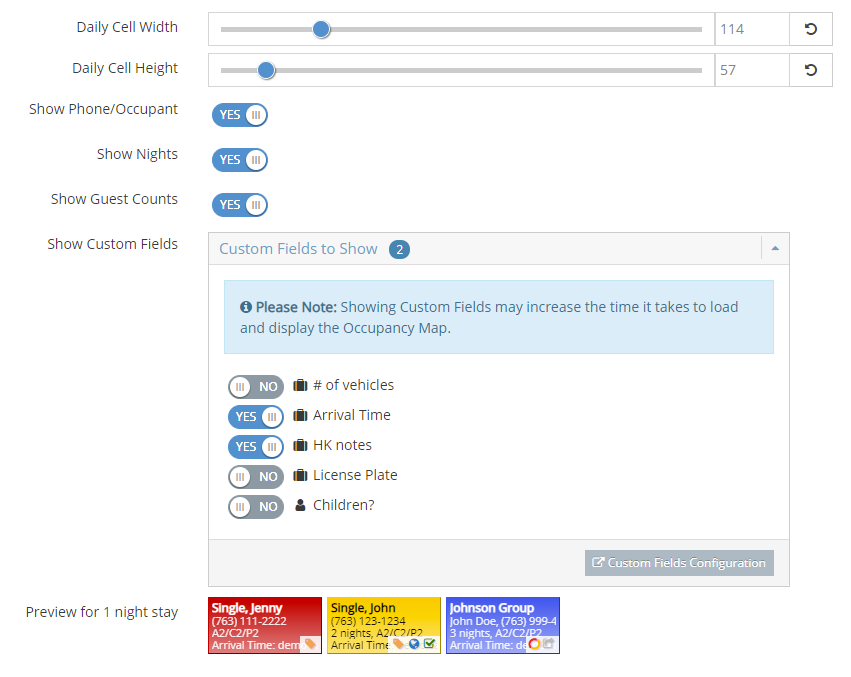
Daily Cell Width & Height - Control the size of the cells on the Occupancy Map.
Please Note! Smaller cell sizes will allow you to see more days and/or units but will limit what you can see within the cell (reservation and guest names, phone numbers, status icons, etc.) due to the size restriction. The Preview area will give you an idea of what text will be visible/cut-off based on your chosen cell size.
PERFORMANCE WARNING! Very small cell sizes will likely affect the performance of the Occupancy Map. The smaller the cell size, the more cells that must be rendered on your screen and this can become a demanding operation. Other factors that affect performance as a result of small cell sizes:
- Monitor size and resolution. The bigger your monitor and resolution, the more cells that can be displayed on it. This might seem great, but again, the more cells the occupancy map has to render, the more performance might be impacted negatively.
- Occupancy. If you have lots of bookings AND you are displaying a lot of days (due to a small cell width and/or big screen size), then the app must download and render all of those bookings on the Occupancy Map. Again, this might seem great but might degrade performance.
Feel free to play with the Daily Cell Width & Height to find the right balance between performance and usability for your needs.
Show Phone/Occupant - Toggle on or off the display of the Phone Number and/or Name of the guest occupying the unit. NOTE: The guest name is only shown if it is different than the reservation name.
Show Nights - Toggle on or off the display of the Number of Nights (Length of Stay) for the unit assignment.
Show Guest Counts - Toggle on or off the display of the Number of Guests assigned to the unit.

NOTE: The guest types are shortened to the first letter of the guest type followed by the number of guests of that type. So, for example, if you have Guest Types that include Adults, Children, and Pets, a unit assignment with 2 Adults, 1 Child and 1 Pet would display "A2/C1/P1" on the Occupancy Map display.
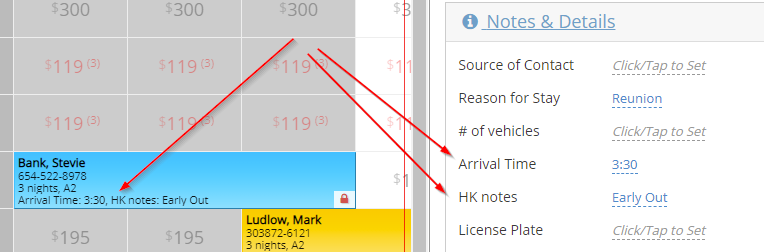
Show Custom Fields - Toggle on or off the display of any of the Custom Fields that you have configured. Both Reservation Custom Fields and Person Custom Fields can be shown on the Occupancy Map. Including a Custom Field on the Occupancy Map gives you a lot of flexibility to include any information that you may deem critical for your business and employees to see at a glance.
In the example below, we've chosen to display 2 Reservation-level Custom Fields on the Occupancy Map: "Arrival Time" and "HK notes", but the choice is yours and your Custom Fields can be anything that's important to you!
NOTE: A couple of important things to note about the display of Custom Fields on the Occupancy Map.
- As noted in the app, enabling and displaying Custom Fields on the Occupancy Map may have an impact on the performance of loading and displaying the Occupancy Map. For most users, this impact will likely be minimal and may not even be noticeable. However, depending on the other settings you've configured (primarily cell sizes), if the number of reservations that must be loaded and displayed is large, this impact may be detrimental. We'd encourage you to experiment to find the right compromise between performance and functionality.
- Person-level Custom Fields will show custom fields for the person assigned to the unit.