How to Create Rate Plans
Use the following steps to create a Cloud PMS Rate Plan:
-
Click the Rate Plans link under the Rates, Taxes heading on the Configuration page.
-
Click the Add New Rate Plan button.
![[image]](https://support.rezstream.com/hs-fs/hubfs/Knowledge%20Base%20Import/2f09f7d9a8f9355e46705011b2c8b00babb120f022ea307ecc3b6defa29f8ce7-4.png?width=623&height=82&name=2f09f7d9a8f9355e46705011b2c8b00babb120f022ea307ecc3b6defa29f8ce7-4.png "embedded image (png)")
-
Complete the fields on the Add New Rate Plan page. Assign a default revenue account and a default tax group. Enter a rate plan description.
![[image]](https://support.rezstream.com/hs-fs/hubfs/Knowledge%20Base%20Import/52f64d07e2a58b5576d304407884a15ea3da893efa17ef09251c52b430549e3f-4.png?width=627&height=357&name=52f64d07e2a58b5576d304407884a15ea3da893efa17ef09251c52b430549e3f-4.png "embedded image (png)")
-
Click the Save button.
-
Next, a rate will be assigned to the rate plan by clicking the Add a Rate button.
![[image]](https://support.rezstream.com/hs-fs/hubfs/Knowledge%20Base%20Import/a1a619e996ccbe4a53f77fc0c3a8eb0f2d66a67fc0c7704a829749d938017a3b-4.png?width=621&height=128&name=a1a619e996ccbe4a53f77fc0c3a8eb0f2d66a67fc0c7704a829749d938017a3b-4.png "embedded image (png)")
6. Complete the fields on the Edit Rate Settings page and click the Save button.
![[image]](https://support.rezstream.com/hs-fs/hubfs/Knowledge%20Base%20Import/7a62916e16f1615a75ea391fd9a1f4a063ab1722202a0fa95b487592f94287b4-4.png?width=627&height=282&name=7a62916e16f1615a75ea391fd9a1f4a063ab1722202a0fa95b487592f94287b4-4.png "embedded image (png)")
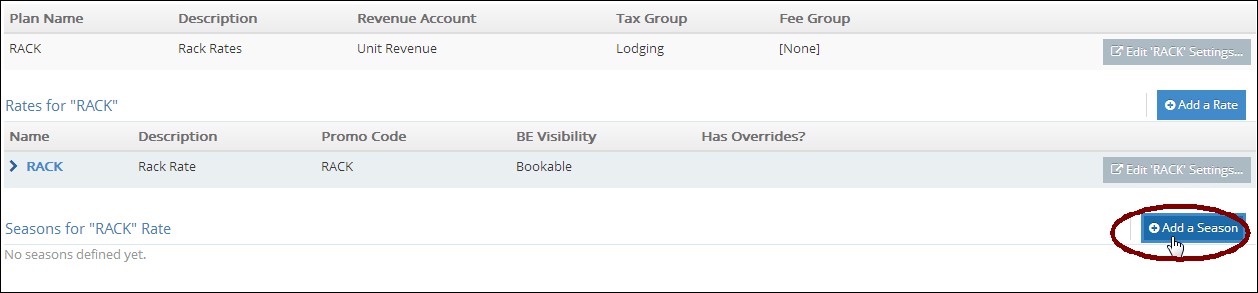
7. To add seasons to the rate plan, click the rate plan name.
![[image]](https://support.rezstream.com/hs-fs/hubfs/Knowledge%20Base%20Import/e0187d801513a4302076438fc95b7aa9d34133a1d32bb423bb3c82e5b0577f0f-4.png?width=283&height=233&name=e0187d801513a4302076438fc95b7aa9d34133a1d32bb423bb3c82e5b0577f0f-4.png "embedded image (png)")
8. Click the Add a Season button.
9. There are three options for defining seasonal rates:
a. Same Rate for All Days. Enter a name for the season and the start date. Define the base rate, base capacity, and extra person charges, and then click the Save button.
![[image]](https://support.rezstream.com/hs-fs/hubfs/Knowledge%20Base%20Import/4732296c031a3a673a8ecf443bbb55c469a7dc8abe4210c03ed417be03382d5e-4.png?width=571&height=245&name=4732296c031a3a673a8ecf443bbb55c469a7dc8abe4210c03ed417be03382d5e-4.png "embedded image (png)")
With this option, the rate is the same, regardless of the days the guest is in house.
![[image]](https://support.rezstream.com/hs-fs/hubfs/Knowledge%20Base%20Import/05de7ffe4dd674eaa390c4f3bb6ad5fabe6b449b3d09e70786db1d47981165cf-4.png?width=525&height=242&name=05de7ffe4dd674eaa390c4f3bb6ad5fabe6b449b3d09e70786db1d47981165cf-4.png "embedded image (png)")
b. Rates Vary by Weekday/Weekend.
i. Enter a name for the season and the start date.
ii. Define weekend days by opening the drop-down menu and selecting the appropriate days.
![[image]](https://support.rezstream.com/hs-fs/hubfs/Knowledge%20Base%20Import/f89d2ffe0a2f50fa5857623188b93a36b4fa75fa891dd20dc1188918d44df26d-4.png?width=443&height=261&name=f89d2ffe0a2f50fa5857623188b93a36b4fa75fa891dd20dc1188918d44df26d-4.png "embedded image (png)")
iii. Define the base rate for midweek and weekends, the base capacity, and extra person charges.
![[image]](https://support.rezstream.com/hs-fs/hubfs/Knowledge%20Base%20Import/ce12406d91b85df2e2d3390d859c71bba7f2d7bbdaa5abbf4de62c0934459529-4.png?width=527&height=265&name=ce12406d91b85df2e2d3390d859c71bba7f2d7bbdaa5abbf4de62c0934459529-4.png "embedded image (png)")
c. Rates Vary Daily.
i. Enter a name for the season and the start date.
ii. Define rates by day.
![[image]](https://support.rezstream.com/hs-fs/hubfs/Knowledge%20Base%20Import/e6d2de5bdd490673a2388bc4dfa77a747c991b1788e701c01d6e2e34f5647363-4.png?width=554&height=241&name=e6d2de5bdd490673a2388bc4dfa77a747c991b1788e701c01d6e2e34f5647363-4.png "embedded image (png)")