
Table of Contents
-
Printing from Google Chrome (rezStream recommended browser)
Overview
Printing the occupancy map works best in the Google Chrome browser. However, it can be printed in Microsoft Edge and Firefox. Also, most browsers do not default to printing background colors, so if your occupancy map isn’t printing as it shows on the screen, please take a look at the “Missing Occupancy Map Colors or Borders” section for your browser on this page.
Printing from Google Chrome
-
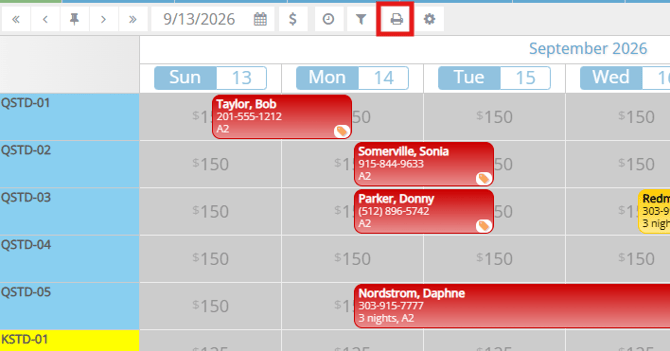
From the occupancy map, select the print icon on the occupancy map toolbar. This will open the “Print Occupancy Map” window.
-
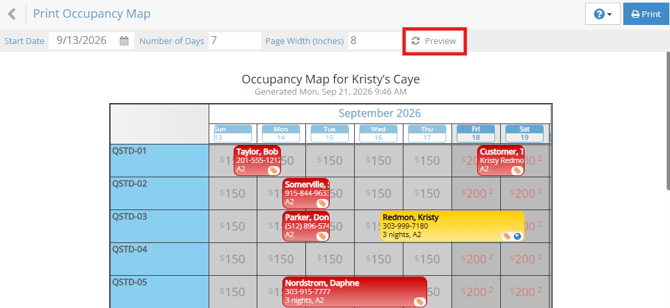
On the print occupancy map window, choose your start date, the number of days you would like to print, and the page width.
Important: If you are printing to 8.5” x 11” paper, choose a width of 8” for portrait orientation or 10.5” for landscape orientation.
-
After making your selections, click the preview button to see how the occupancy map will look for printing and to update the preview with your choices from step 2. (Note: You must first generate this preview before you can print.)
-
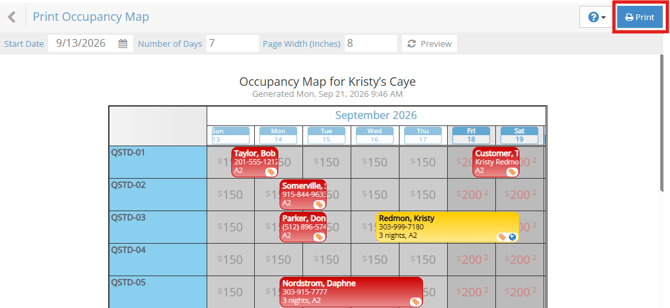
Select the print button in the upper right-hand corner of the screen to generate the printable occupancy map.
-
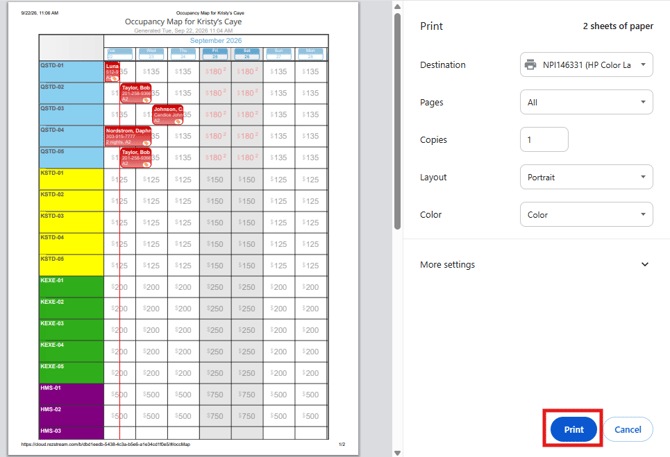
A window will open with additional settings and you can now print the occupancy map to your printer using the print button on the right pane.
Print Occupancy Map On One Page
If your occupancy map is printing on more than one page, you may be able to fit it onto just one page.
To print one page:
-
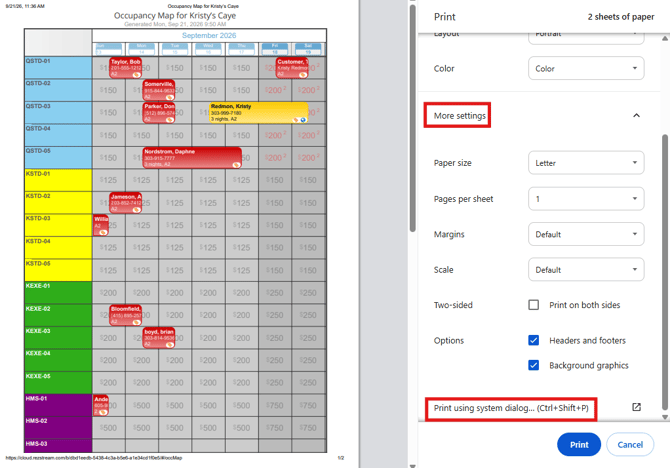
From your printable version of the occupancy map, you have access to your printer’s settings. From the lower right pane on this window, choose More Settings and then select Print using system dialog option.
-
This will open the printer settings. These settings are specific to each printer, so they cannot be covered in detail here. However, you will want to select your printer in this dialog and click the Preferences button. Then, look for an option called “Fit to Paper Size”, “Fit one page”, or similar. This option will allow you to scale your document down to one page for printing.
Please note, when scaling down the document, if the occupancy map becomes very narrow, you may increase the printable width in the occupancy map preview window (step 2 in the printing instructions and shown above).

Missing Occupancy Map Colors or Borders
If your print preview does not show all of the occupancy map colors and borders, you must first turn on the print background graphics setting for your browser.
To do this:
-
From your print preview (step 3 above), click the blue “print” button on the top right corner of the screen.
-
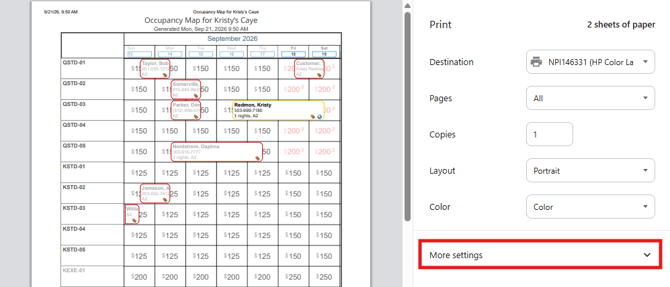
Click on the “more settings” in the right pane to get more printing options.
-
Check the box next to “background graphics”.
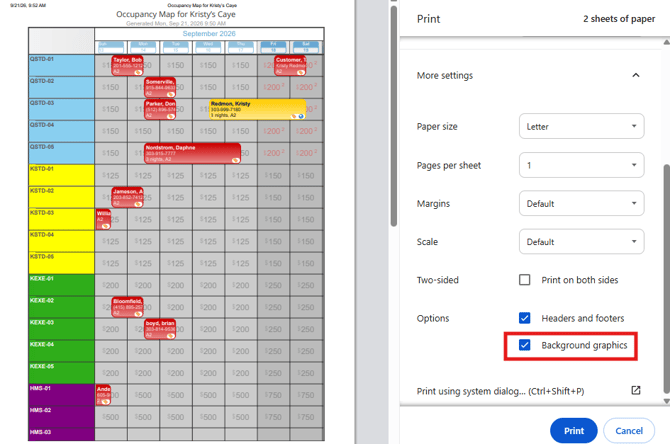
You should now be able to print the occupancy map as it displays in the preview (with all colors and borders).
Printing from Microsoft Edge
-
From the occupancy map, select the print icon on the occupancy map toolbar. This will open the “Print Occupancy Map” window.
-
On the print occupancy map window, choose your start date, the number of days you would like to print, and the page width.
Important: If you are printing to 8.5” x 11” paper, choose a width of 8” for portrait orientation or 10.5” for landscape orientation. -
After making your selections, click the preview button to generate the printable occupancy map. (Note: You must first generate this preview before you can print.)
-
Select the print button in the upper right-hand corner of the screen to generate the printable occupancy map.
-
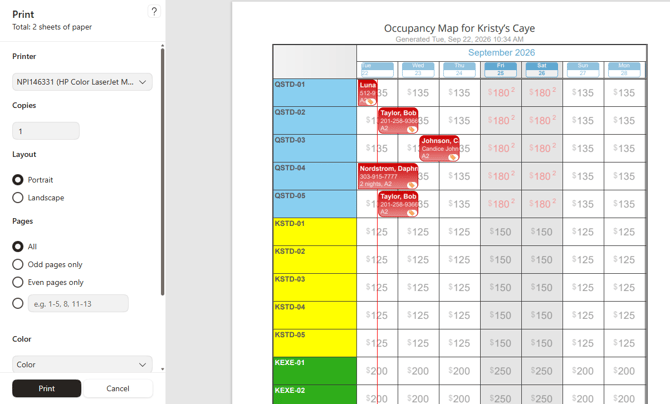
A window will open with additional settings and you can now print the occupancy map to your printer using the print button on the left pane.
Print Occupancy Map On One Page
To print to one page:
-
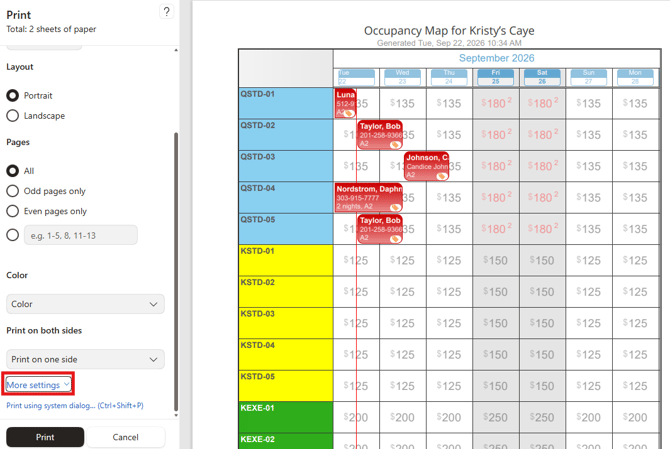
From your printable version of the occupancy map, you have access to your printer’s settings. From the left pane on this window, choose More Settings.
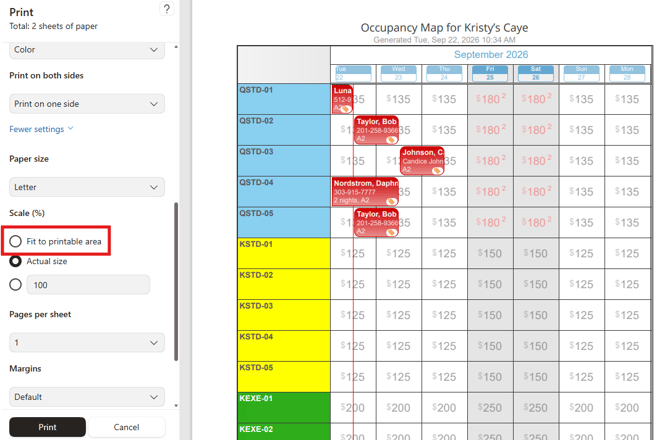
- Select the Fit to Printable Area option.
-
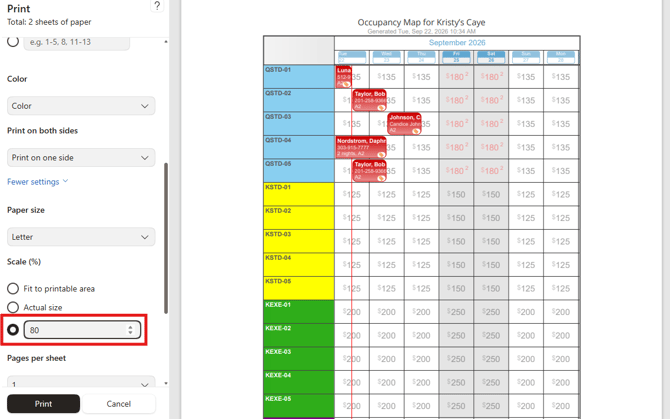
You also have the ability to increase or decrease the scale by a percentage amount. See below.
Please note, when scaling down the document, if the occupancy map becomes very narrow, you may increase the printable width in the occupancy map preview window (step 2 in the printing instructions and shown above).
-
Once you are satisfied with the size and it fits one page, you may click print and send your occupancy map to your printer.
Missing Occupancy Map Colors or Borders
If your print preview does not show all of the occupancy map colors and borders, you must first turn on the print background graphics setting for your browser.
To do this:
-
From your print preview (step 3 above), click the blue “print” button on the top right corner of the screen.
-
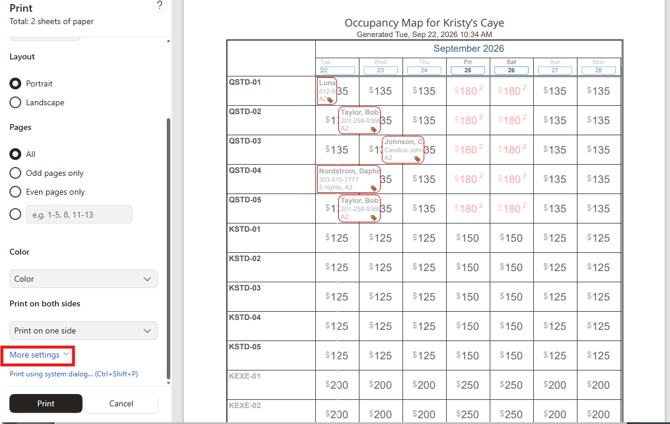
Click on the “more settings” in the left pane to get more printing options.
-
Check the box next to “background graphics”.
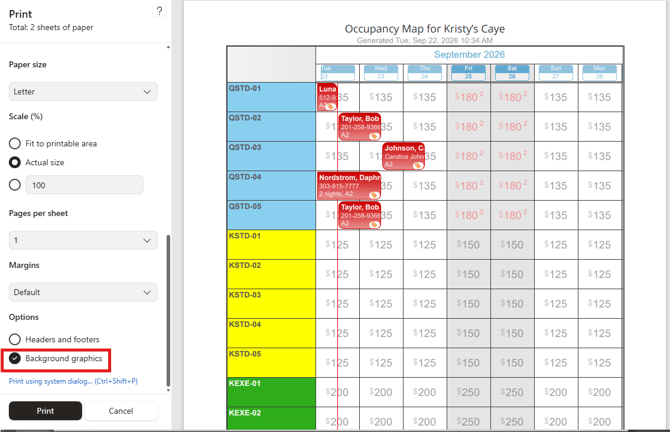
You should now be able to print the occupancy map as it displays in the preview (with all colors and borders).
Printing from Firefox
-
From the occupancy map, select the print icon on the occupancy map toolbar. This will open the “Print Occupancy Map” window.
-
On the print occupancy map window, choose your start date, the number of days you would like to print, and the page width.
Important: If you are printing to 8.5” x 11” paper, choose a width of 8” for portrait orientation or 10.5” for landscape orientation. -
After making your selections, click the preview button to generate the printable occupancy map. (Note: You must first generate this preview before you can print.)
-
Select the print button in the upper right-hand corner of the screen to generate the printable occupancy map.
-
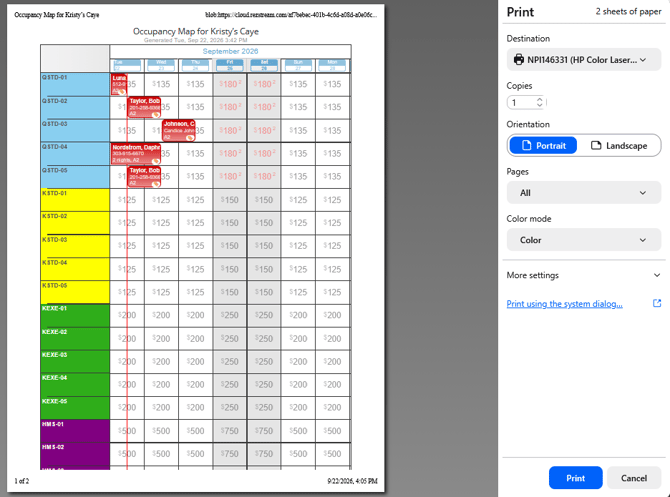
A window will open with additional settings and you can now print the occupancy map to your printer using the print button on the right pane.
Print Occupancy Map On One Page
To print to one page:
-
From your printable version of the occupancy map, you have access to your printer’s settings. From the right pane on this window, choose More Settings.
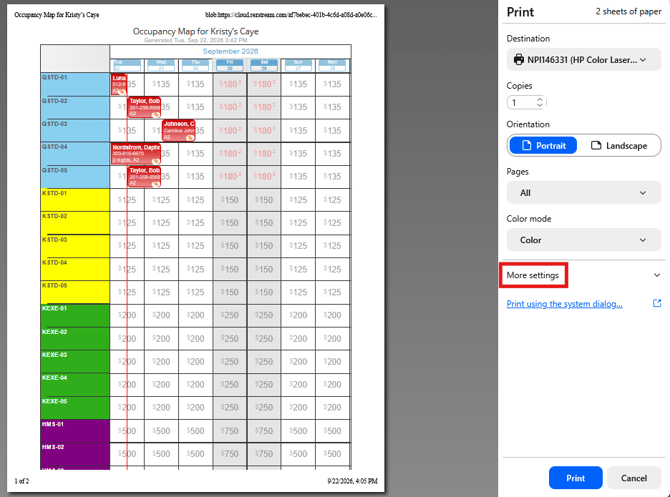
- Select the Fit to page width option.
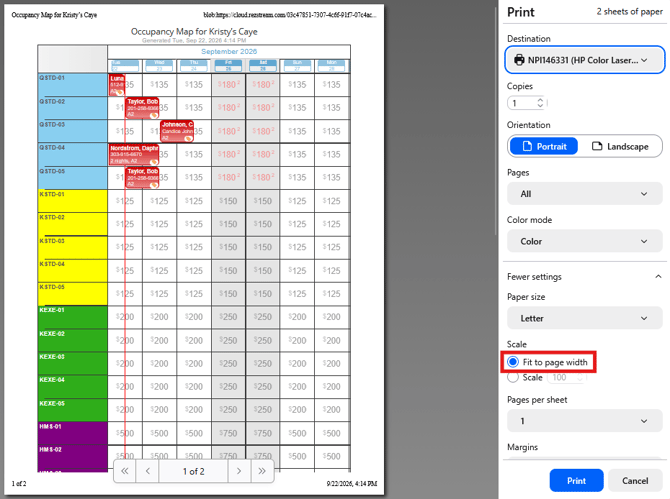
- You also have the ability to increase or decrease the scale by a percentage amount. See below.
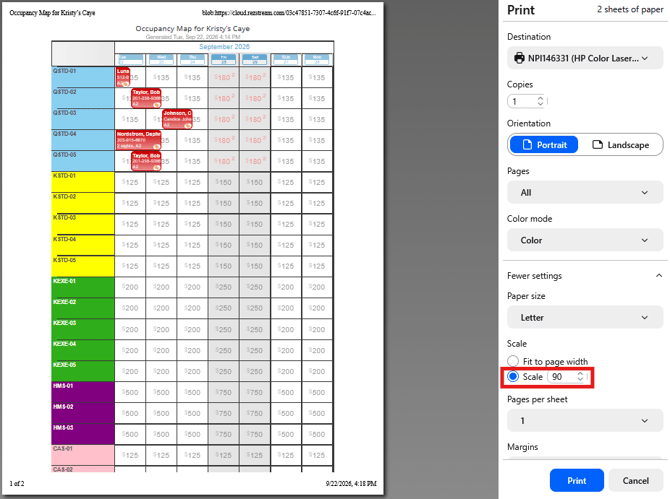
Please note, when scaling down the document, if the occupancy map becomes very narrow, you may increase the printable width in the occupancy map preview window (step 2 in the printing instructions and shown above).
-
Once you are satisfied with the size and it fits one page, you may click print and send your occupancy map to your printer.
Missing Occupancy Map Colors or Borders
If your print preview does not show all of the occupancy map colors and borders, you must first turn on the print background graphics setting for your browser.
To do this:
-
From your print preview (step 3 above), click the blue “print” button on the top right corner of the screen.
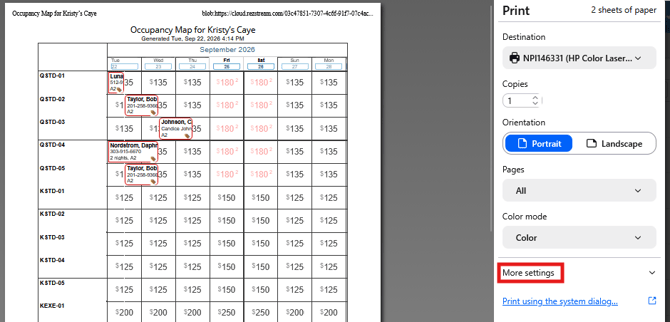
-
Click on the “more settings” in the right pane to get more printing options.
-
Check the box next to “background graphics”.
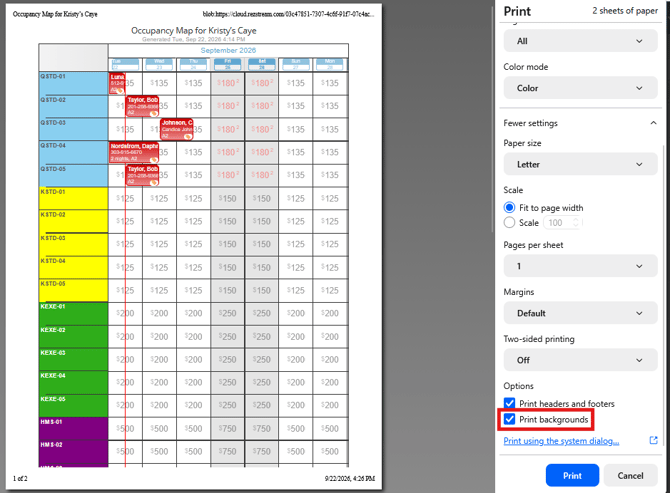
You should now be able to print the occupancy map as it displays in the preview (with all colors and borders).