
Table of Contents:
- Overview
- Setting Up Your First Resource
- Setting Up a Seasonal Resource
- Booking Resources
- Quoting a Resource with a Unit
- Managing Resources for an Existing Reservation
- Adding a Resource to a Reservation
- When There's No Inventory
- Putting a Resource Out of Service
Overview
We place Resources front-and-center on your Occupancy Map. This gives your front desk personnel the tools they need to respond to guest needs. Or, to up-sell the guest on other offerings they might enjoy.
At this time, resources can only be booked with a unit. Additionally, resources can only be booked per day.
NOTE: You must be on rezStream's Standard or Professional subscription level to have access to Resources.
Setting Up Your First Resource
We'll start by configuring our Resource. We have several cribs available for our guests and we want to ensure they can book them with their stay.
-
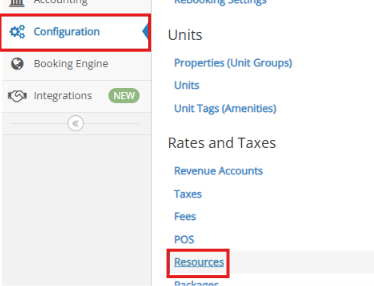
Navigate to the Configuration tab and select Resources.
-
Select Add New Resource in the top right corner

-
We're going to add our new Crib resource. In this example, the cribs are complimentary for guests so we won't charge for them. And, we always have 3 on hand so there's no need to configure any seasonal adjustments.
- Give the resource a Name - Crib
- Enter a Daily Price - $0
NOTE: A Weekly Price can also be applied for Resources with a special week-long rate. - Set your base Inventory - 3
- Track as Key Item - We can quickly see on the dashboard in the Key Items Widget when we have a guest arriving with a crib resource on their reservation.
- Property - Choose the property.
- Select the Revenue Account associated with the resource.
- Tax and Fee Group is optional.

-
Click the Save Resource button to successfully save your Resource.
Setting Up a Seasonal Resource
Some Resources have seasonal availability or seasonal price adjustments. You can configure adjustments using the same shared Manage Business Seasons that are used when managing rates.
-
Let's set up a resource for Pool Toys. In this example, we rent these to guests during the Summer but we certainly don't want anyone trying to have a water fight at our outdoor pool in January!
-
After setting up the required fields for our new resource, we can navigate to the Seasonal Adjustments tab. It's ok if you haven't saved your resource yet; you can still do that after configuring your adjustments.

NOTE: If you haven't configured your Manage Business Seasons yet, you can do so from this screen.
How to Configure Manage Business Seasons in the Season Adjustments Tab
Manage Business Seasons allow you to organize seasonal periods for your property's operations. Managing these seasons helps ensure that your seasonal resources are configured for the appropriate dates.
To configure Manage Business Seasons
-
- Select Manage Business Seasons from the Seasonal Adjustments tab
- Choose a Start Date for each season.
- Add a Season Name (optional)
- Save your changes.
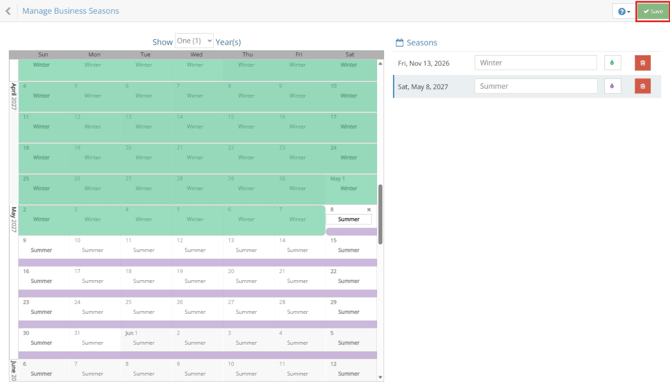
Note: When making changes to a Business Season, review any seasonal resources associated with it to ensure the configuration remains accurate.
3. Let's go there now and adjust our inventory. For our winter seasons, we can Adjust Inventory By a value of -20 to leave us with an Effective Inventory of 0 during the winter.
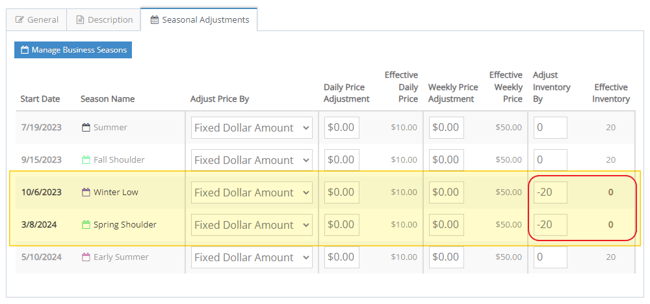
4. We've adjusted the inventory down to zero during our winter seasons. We haven't adjusted the price at all, but we could do that as well. Go ahead and click Save Resource and then we'll explore how to book our resources.
Booking Resources Quoting a Resource with a Unit
-
Resources are shown at the bottom of the occupancy map. And, they will be collapsed by default. Each cell will show the seasonally adjusted price, the quantity available, and the seasonally adjusted inventory for that day.

As a reminder, resources can only be booked along with a unit so let's go ahead and do that now.
-
Highlight your unit and the resource(s) that you would like to book. Here I've quoted a three-night stay along with a crib for all three nights. The guest has also asked to rent pool toys on two of the dates.


TIP: You do not need to book a resource every day. If you want to assign it for only a portion of a stay, click those days.
If you want to change any portion of the quote for a unit or resource, click the Pencil icon next to the item.
Let's go ahead and book this stay.
Managing Resources for an Existing Reservation
After creating the booking, we can see the assigned resources on the reservation.

TIP: You can add a resource to any existing reservation as well. Click the Add Resource button on the reservation.
-
Back to the example from earlier, now the guest requested two sets of Pool Toys. We'll fix that now. Select the Pool Toys assignment and click the Edit button.

This screen is more powerful than it might look at first glance. You can quickly change quantity and price for all days, or specific days. You can remove or add resources back for any day in the reservation. You can even extend the resource assignment beyond the reservation if needed.
Don't worry, though. We won't let you increase the quantity past whatever you have on hand for that day.
Adding a Resource to a Reservation
-
If you need to add a resource to an existing reservation, navigate to that reservation and click the Add Resource button.

-
This will bring up the Add Resource screen. It's identical in function to the Edit Resource screen we just saw with one notable exception... you must start by selecting a resource.
-
At this point, if you do have a Weekly Price and the length of your resource assignment is 7 days or longer, the Weekly Price will be quoted by default. You'll have the option to toggle back to the Daily Price if you so choose. Any extra days beyond 7 (but less than 7 extra days) will be quoted at the Daily Price.

NOTE: By default, all days in the reservation will be quoted. If you want to remove any days, click the red 'X' button.
When There's No Inventory
If there is insufficient inventory for some days during the reservation, we will warn you and indicate which days cannot be fulfilled. You will still have the option of booking the resource for the other days.

NOTE: If the resource is completely unavailable for the dates requested, we won't let you add the resource
Putting a Resource Out of Service
You can put one or more resources out of service, either with units as well or on their own. It is currently only possible to do this from the occupancy map.
-
Highlight the resource days that you would like to put out of service and then select the Out of Service tab on the quote section.

TIP: While it's not yet possible to book a resource by itself, you can mark it as out of service as a workaround.
TIP: If you need to put a resource out of service for a long period, you may want to set up a seasonal adjustment instead to decrease your inventory.